


Turning on and clearing the instrument
-
15. 11. 24
- posted by: Super User
-
Hits: 31663
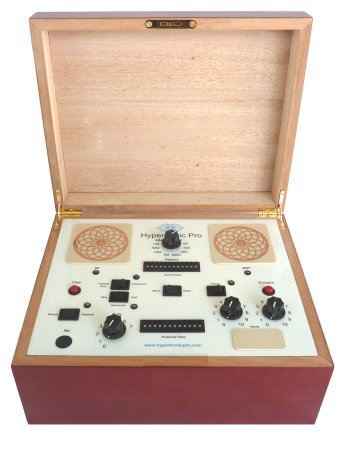
Hypertronic Pro Recommended Software
 The following method of integrating software with the Hypertronic Pro is recommended for Health Care Professionals only, as the frequency sets in the software are labelled by disease condition.
Connecting Rife Pro X2 from your computer to your Hypertronic Pro
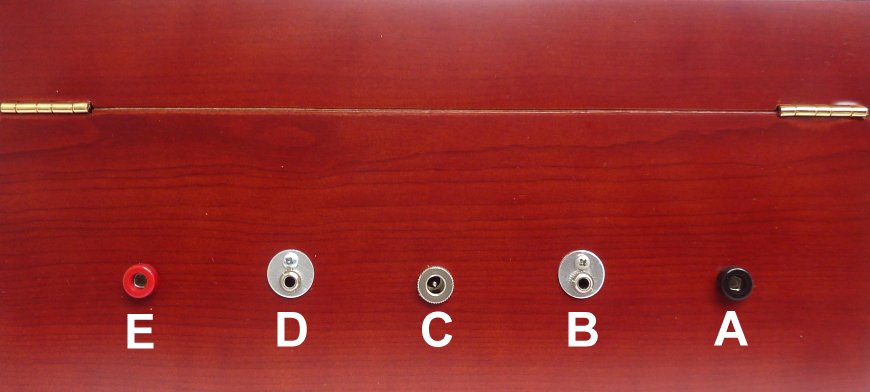
We recommend the Rife Pro X2 software, which integrates Rife sound frequency sets between the headphone port on your computer and the input on the rear of the Hypertronic Pro labelled B in the picture to the right. A 3.5 mm male to male cable is provided with Hypertronic Pro for this purpose but the software must be purchased separately (see purchase options at the bottom of this page).
Using the Rife Pro software, you are effectively turning your computer into a Rife machine. Instead of delivering the Rife frequencies in the form of sound, the frequencies are fed directly into the Hypertronic Pro circuit, allowing you to make remedies or to create a targeted broadcast based on biological matter on the witness plate.
About the Rife Pro X2 Software
 "Use Your Computer integrated with the Hypertronic Pro as a Powerful Rife Machine. Get Pain Relief and Features Not Available In ANY Other Rife Machines..."
Rife Pro X2 is the latest Rife Technology. It has a powerful Rife Frequency Generation system that lets you use your computer when coupled with the Hypertronic Pro as a Rife Machine.
It also has a built-in TBSW system for pain relief, insomnia, weight loss and more.
Rife Pro X2 is easy for anyone to use - no complicated scripts and programming required as with other Rife Machines. All it takes is a couple of mouse clicks and you're up and running. There's no need for a bunch of clunky wires and electrodes either.
You'll see real results with Rife Pro X2, even when drugs and other methods have entirely failed. If you really want to get rid of something - you need to get to the "source" of the problem. That's what Rife Pro X2 does. It gets directly to the source of the problems.
As you read this entire page, you'll discover why Rife Pro X2 is the only logical choice for anyone interested in Rife Technology.
Now, you can join the thousands of people who have discovered the power of Rife Frequencies. Affordable, powerful and easy to use - this is Rife Technology for the 21st Century.
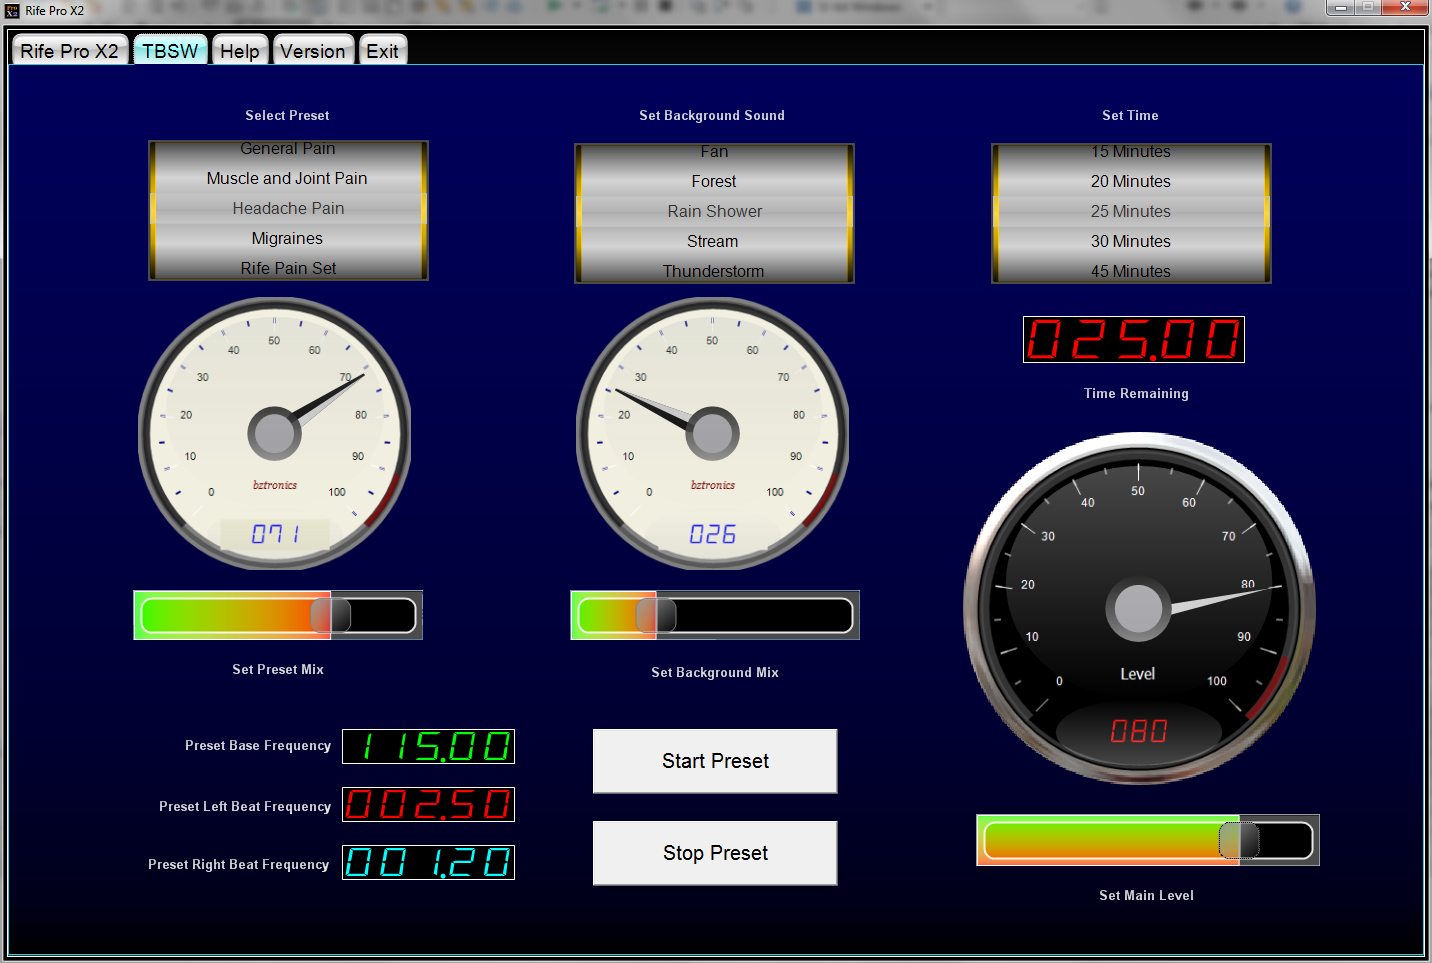
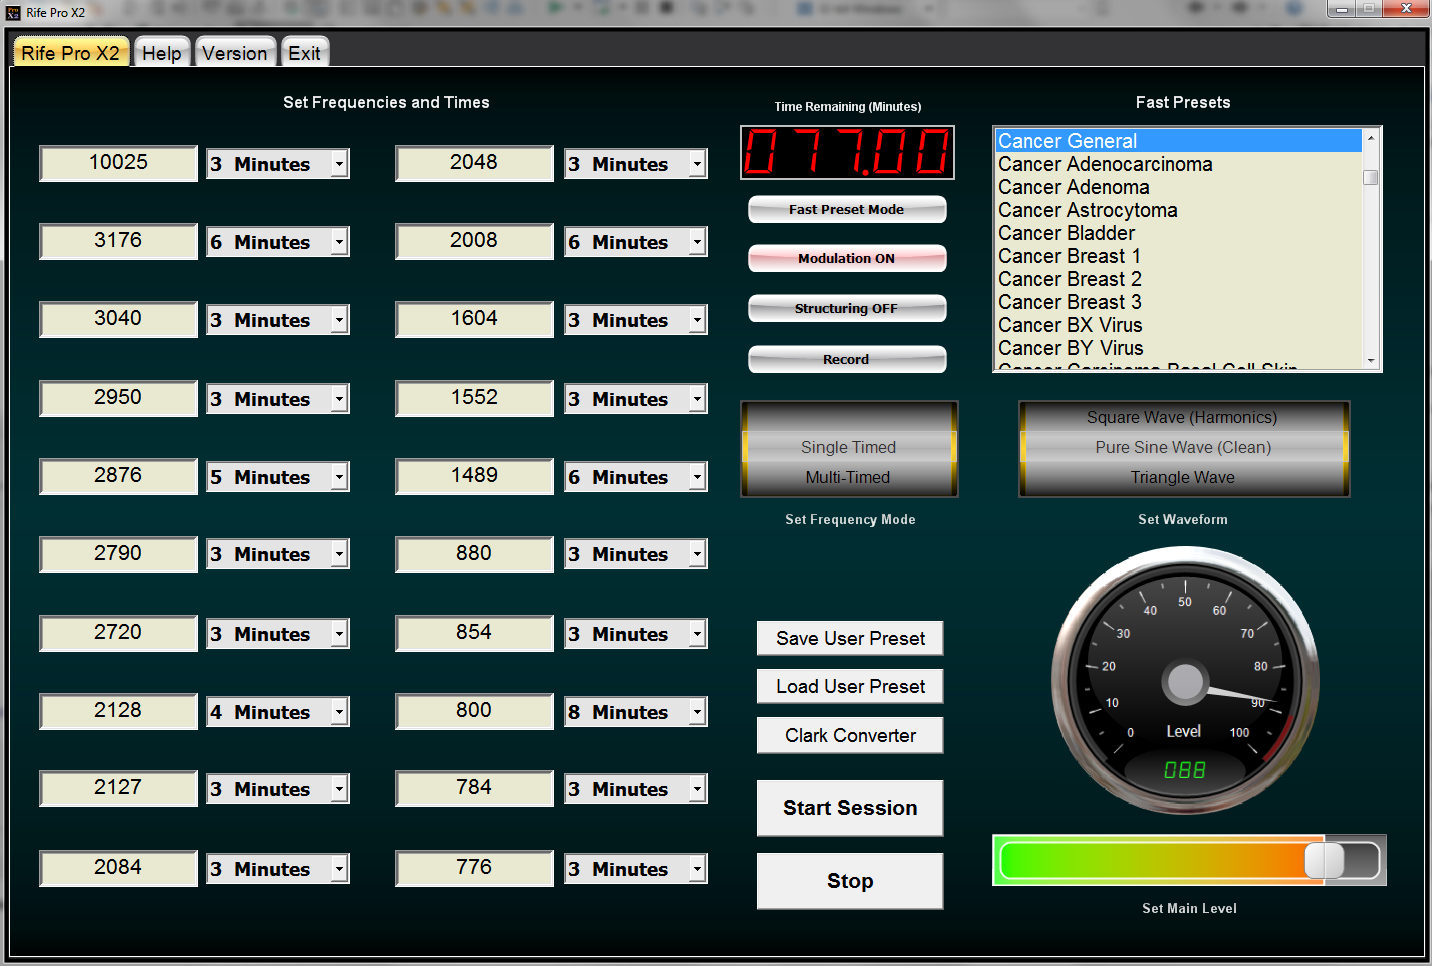 Rife Pro X2 - Main Control Panel
Dr. Royal Raymond Rife is referred to as "The Man Who Cured Cancer". Dr. Rife found that certain frequencies destroyed cancer cells, viruses, parasites and bacteria. He did this with a frequency generating device that became known as a Rife Machine.
Using Rife Pro X2, you can now use your computer and the Hypertronic Pro to safely and effectively deliver powerful Rife Frequencies in the comfort of your own home.
Using the power of modern computers, Rife Pro X2 brings Rife's brilliant work in to your hands. Reports from doctors and people using Rife Pro X2, state that it is as good as or better than Rife's original Beam Ray Equipment.
How It Works
You've probably heard about or seen an opera singer shattering a wine glass by singing a note. The note the singer sustains, is the resonant frequency of the wine glass. This sustained sound wave (note) causes the glass to shatter.
Scientists like Tesla and Dr. Rife, have proven that everything that exists has a resonant frequency of it's own. For instance, the carcinoma cancer cell has a resonant frequency of 2128 Hz. When a cell is resonated at it's resonant frequency, the cell is destroyed. Parasites, viruses, bacteria and other organisms all have their own resonant frequencies. The frequencies that destroy these organisms are called Rife Frequencies. See the video below.
A regular Rife Machine comes with two handheld metal cylinders that you hold in each hand. With Rife Pro X2, you'll connect to Hypertronic Pro and then use either the hand held probe that comes with Hypertronic Pro to deliver frequencies, or you can use a targeted broadcast based on biological witness. You can even put the frequencies into a vibrational medicine remedy. Another alternative to using the software is to use the speakers from your computer, although this is considered far less effective. The authors of the software originally designed it around using through speakers, and they have previously said;
- Special sound waves are optimized, highly effective and powerful with this technology.
- Sound is 5 X more efficient in water as it is in air - we are made up primarily of water.
- The body adjusts more readily to this efficient method of frequency delivery. Sound is natural - electricity not so much...
- Heart Safe and Pet Safe!
Despite this, using with Hypertronic Pro is far more effective, especially when integrating with HARMONICS option on Hypertronic Pro which adds penetration frequencies, allowing healing frequencies to be delivered deep into the body rather than just to the surface area sa is the case with sound delivery by speaker.
Rife Pro X2 generates pure, stable frequencies. There is no frequency drift, as there is in other analog Rife Machines and old Beam Ray Machines. This is because of the advanced DSP used in the waveform generation.
Fast Presets
Rife Pro X2 has over 700 Fast Presets. A breeze for anyone to use, all of this power is just a couple of mouse clicks away.
Fast Presets in Rife Pro X2
Scroll above to see the Fast Presets in Rife Pro X2
There are presets for most of the problems you could ever run into in a lifetime. Also presets for pain relief, detox and newer diseases, parasites and viruses. There are actually several pain relief preset types.
Remember though, you are not limited to the Fast Presets. You can enter your own frequencies and save your modified information as your own presets.
The TBSW System
There are so many problems that go along with being sick with a disease, that it only makes sense to address those issues as well. Problems like pain, insomnia, rejuvenation and others need to be dealt with. That's what the TBSW System in Rife Pro X2 does.
TBSW stands for Trilateral Balanced Sine Wave. These special sound waves are similar to Binaural Beats, but are more complex and dedicated to health.
It's popularity came about, because of its ability to deliver consistent, effective solutions for pain relief and many other problems.
There are 15 Fast Presets in the TBSW system. Scroll below to see the presets.
The TBSW Presets have been crafted with TBSW frequencies for maximum effectiveness. The LED frequency display shows which frequencies we've chosen for each one.
TBSW is easy to use and has several relaxing background sounds to choose from. The waves are integrated with Hypertronic Pro, but stereo or headphones can also be used.
Click the problem, select a background sound and time, connect to Hypertronic Pro - Click Start Preset. That's all there is to it.
For Chiropractors, Doctors, Dentists and Physical Therapists, you can run one of the Pain Presets at the end of your session. TBSW will make your pain medications and Tense Units obsolete. It will also leave you with very happy patients. Don't get left behind on this powerful technology.
Rife Pro-X Benefits :
- Over 700 Fast Presets - 2 mouse Clicks and you’re up and running.
- Structure water and oils with Rife Frequencies so you can make homeopathic remedies for pain and more.
- TBSW System for pain relief and other issues associated with the original health problem that you're fixing. You can't get that anywhere else.
- Export Rife Frequencies to wave audio format so you can make CDs for yourself, your clients or patients.
- Doesn't require a bunch of wires, electrodes or script programming like all of the other Rife Machines out there.
- Frequency resolution of 0.0001 Hz (magnitudes more accurate than the most expensive Rife Machines available)
- Run up to 20 Frequencies at the same time in Multi-Frequency mode, saving you time or you can also use Single Frequency Mode.
- Built-in frequency converter allows you to use RF and thousands of Hulda Clark frequencies that aren't available in any other Rife Machine.
- There are no expensive tubes to replace every few months.
- Uses your computer's ANALOG audio outputs. No weird drivers to install or USB cables required.
- You save a lot of money, because you already own the hardware - your computer.
- Save and Load an unlimited number of your own presets for quick recall.
Anyone that's done their research on Rife Machines agrees - whether its the little plastic units they sell or a Rife Machine that costs thousands of dollars - they do not stand up to Rife Pro X2 in effectiveness, ease-of-use or features.
The Rife Pro X2 Software can be purchased online directly from Bztronics by clicking here.
Add a comment
-
15. 11. 12
- posted by: Super User
-
Hits: 13000
Photon Sound Beam Integration
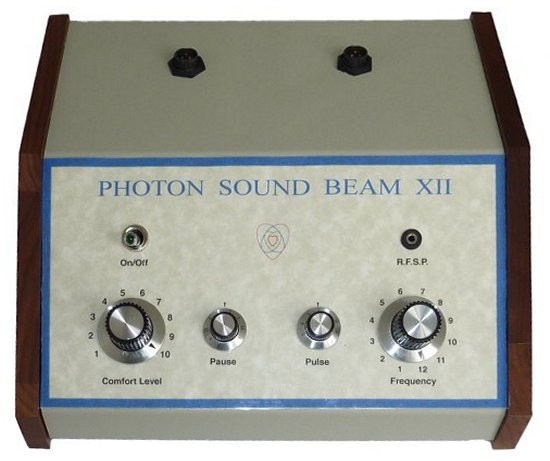 The Hypertronic Pro can be used completely independently by itself, or synergistically for enhanced results with the Photon Sound Beam. There is a specially designed port in the Hypertronic Pro which allows the RFSP port on the Photon Sound Beam to directly connect to the Hypertronic Pro. This can be used for the following options;
- Allow the Hypertronic Pro to broadcast Photon Sound Beam frequencies (e.g., the general sweep on the level 12 setting for 30 mins) to any patient (with their permission) using their biological sample, voiceprint or picture worldwide. For this option connect the 3.5mm male to male cable from the RFSP port on the Photon Sound Beam to the port labelled B below.
- When using the Photon Sound Beam for a therapy session, allows the Hypertronic Pro to send inverse mirrored energies back to the Photon Sound Beam for inclusion in the hand held plasma tubes when using Mirror mode. Alternatively you can send any frequency created by the Hypertronic Pro using the Direct mode. For this option connect the 3.5mm male to male cable from the RFSP port on the Photon Sound Beam to the port labelled D below.
Procedure
Warning: Ensure that both the Hypertronic Pro and the Photon Sound Beam are switched off when connecting the 2 units using a 3.5mm male to male lead. Having both machines switched off is important when connecting the lead, which could otherwise lead to damaging a transistor in the Photon Sound Beam.
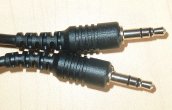 Use port B for frequencies going from Photon Sound Beam to Hypertronic Pro, or use port D to feed frequencies from the Hypertronic Pro back to the Photon Sound Beam plasma tubes to be included in the Photon Sound Beam therapy session. Use the 3.5 mm male to male cable that comes with Hypertronic Pro, shown in the picture to the right.
- Once both units are connected, switch on the Hypertronic Pro and wait until the clearing procedure has completed (approx 20 seconds).
- If you are wishing to broadcast the frequencies of the Photon Sound Beam, then use the biological sample of the patient that will be receiving the frequencies from the Photon Sound Beam.
- If you are adding frequencies to the Photon Sound Beam set the Harmonics to Neutral (central position), select Continuous, Direct and dial your frequencies into Imprint and Broadcast Rates as appropriate.
- Select the programme on the Photon Sound Beam (e.g., setting 12 for a general sweep).
- Push Energize on Hypertronic Pro and then turn on the Photon Sound Beam. Ensure that you switch the Photon Sond Beam off at the end of the cycle followed by the Hypertronic Pro.
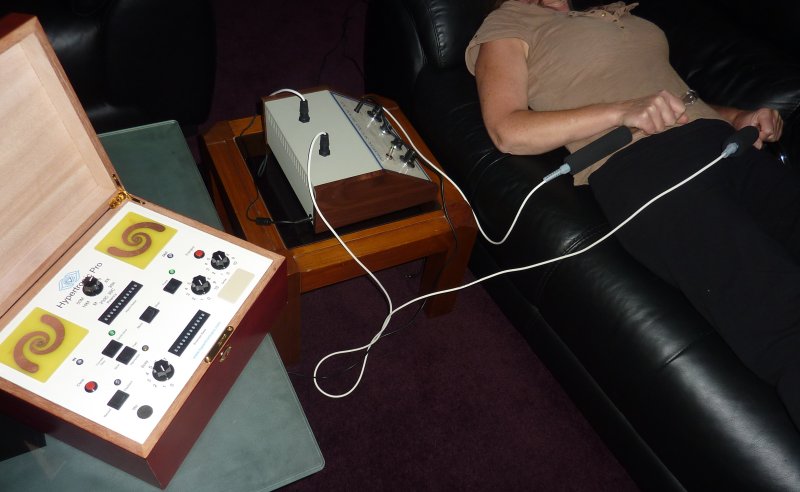
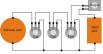
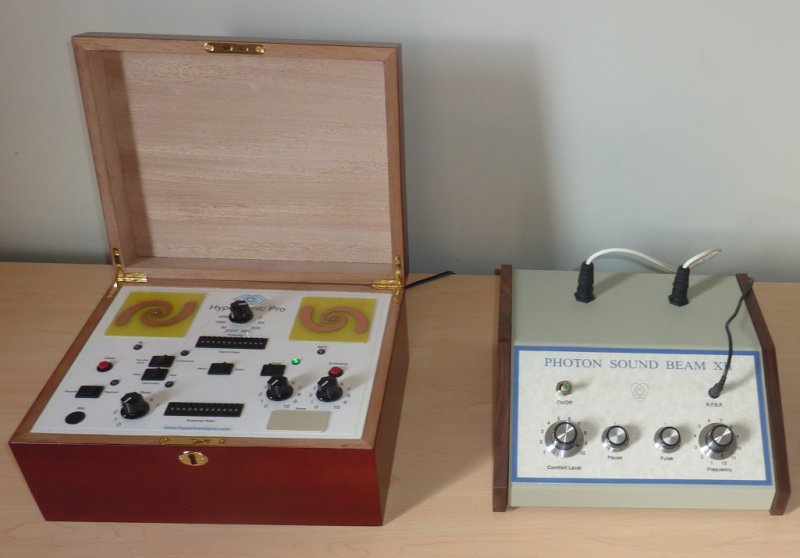
Example of Hypertronic Pro Connected to Photon Sound Beam, with patient voice recording as witness and mirror mode feeding frequencies back into Photon Sound Beam, which patient receives with normal Photon Sound Beam sweep frequencies (on PSB setting 12) through plasma tubes.
Add a comment-
15. 11. 12
- posted by: Super User
-
Hits: 7086
Creating Vibrational Remedies
Use this procedure when using rates from one of the publications to create a vibrational remedy such as a homoeopathic, a flower essence etc
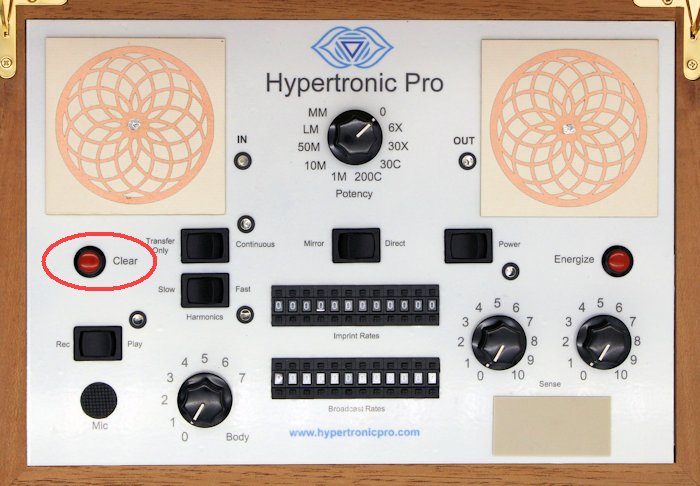
- Zero everything by pressing the CLEAR button and wait for the process to complete.
- Remove any voice recording by pressing the record button briefly once.

- Set to DIRECT.
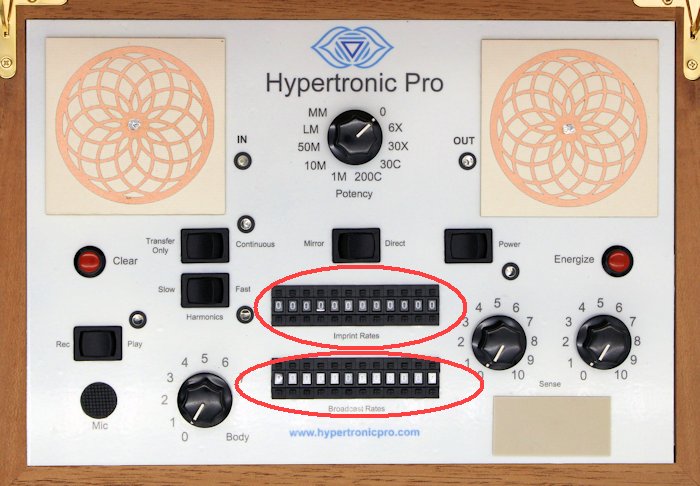
- Consult the reference guides to determine the rate of the remedy that you are creating (click here to view the available guides). For homoeopathic remedies, input the rate in the upper rate bank: IMPRINT RATES.
For radionic remedies, enter the rate into BROADCAST RATES.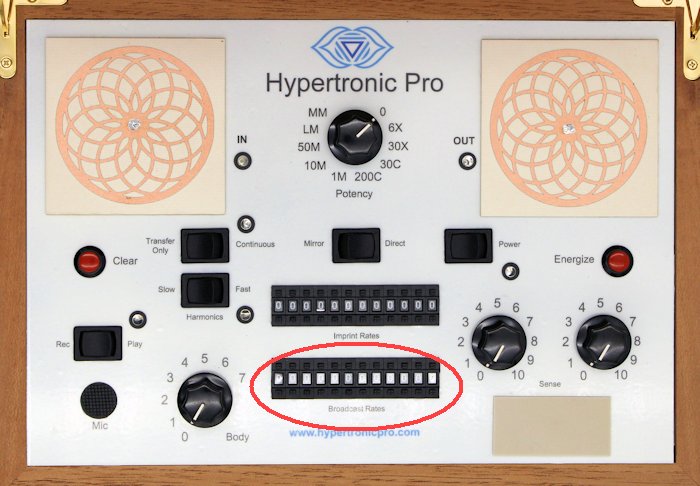
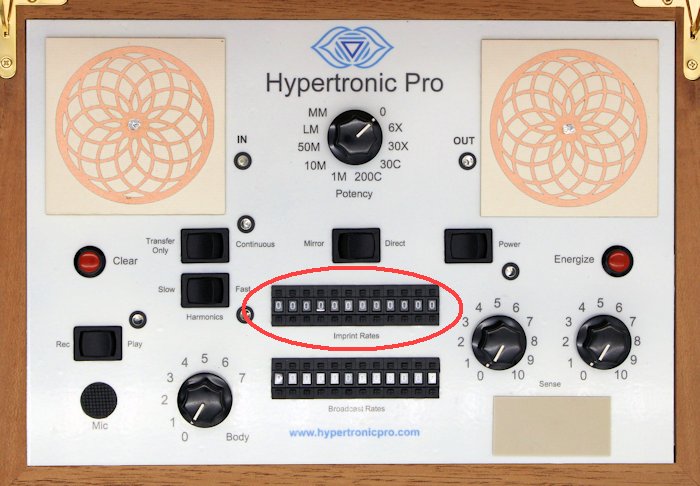
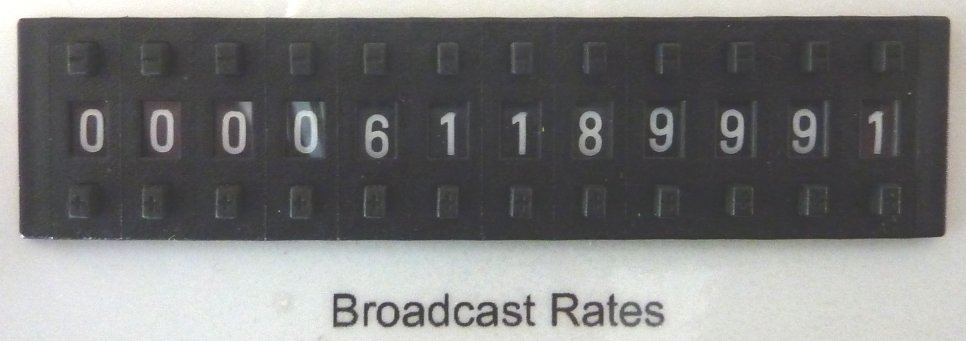
- Always make sure numbers are entered from the right side. For example the Sulis guide says that the rate for producing a Typhoid vaccine is 61189991. It should be entered as 000061189991 as shown in the picture below and NOT as 611899910000.
- If making a homoeopathic remedy, adjust the POTENCY knob for desired potency.

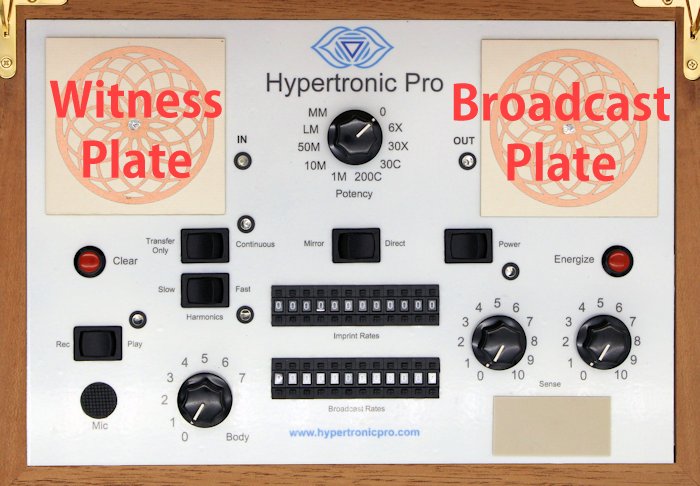
- Place target (e.g., dropper bottle or pillules as described above) on broadcast plate on the right siode of the unit.
- Press ENERGIZE for timed operation. The energize process will take approximately 24 seconds to complete.
-
15. 11. 12
- posted by: Super User
-
Hits: 8916
Copying Vibrational Remedies
All forms of vibrational medicine remedies (e.g., homoeopathics, flower essences, radionic and so on) can easily be copied using the following procedure.
- Zero everything by pressing the CLEAR button and wait for the process to complete.
- Remove any voice recording by pressing the record button briefly once.
- Place the remedy being copied onto the left witness plate, and the blank remedy onto the right broadcast plate.
- Set to DIRECT.
- Ensure Imprint Rates and Broadcast Rates are set to zero.
- Press ENERGIZE for timed operation. The energize process will take approximately 24 seconds to complete.
Notes
- When using the INPUT plate for copying, the lower rate bank is still able to be used. This adds the possibility of a second rate/remedy to a vibrational imprint.
- Place WITNESS SAMPLE (and optionally any REMEDIES to include in the test) on the LEFT "IN" Plate -- AND if Making a Remedy -- Place Virgin Dropper Bottle w/ Distilled Water or Lactose Pellets on the RIGHT "OUT" Plate. Always ensure that glassware (e.g., 30-50mL dropper bottles, clean small glass jars etc) are used on the right hand plate when making remedies as plastic and other material containers are unsuitable.
-
15. 11. 12
- posted by: Super User
-
Hits: 13771
Broadcasting and Making Remedies
- After preparing the witness and clearing the machine, place the WITNESS SAMPLE on the left witness plate.
- Professionals
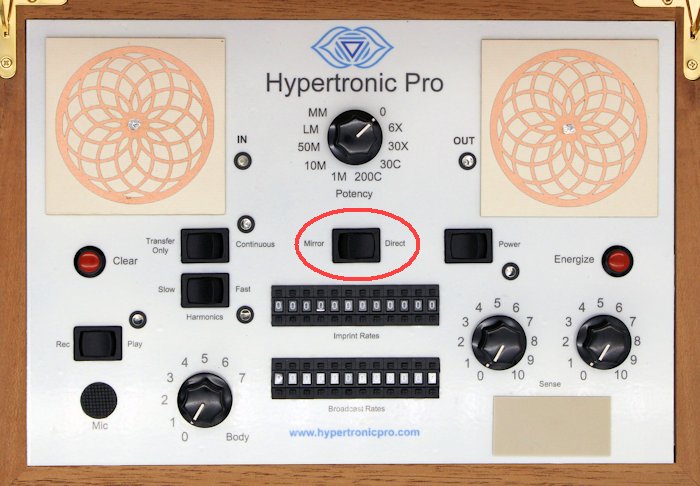
Select Direct or Mirror using the toggle switch shown below.
The Direct Selection is used for Making Vibrational Remedies OR Witness Sample Broadcasting when using "RATES".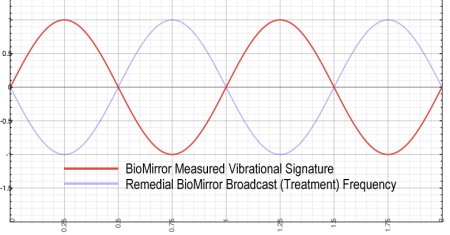 Mirror is used for broadcasting the remedial BioMirror broadcast frequency (see image to right) which is measured from the biological or voice witness sample. The "Mirror" Selection INVERTS the "vibrational signature" of the WITNESS SAMPLE on the In-Plate and Out-Plate EMPTY. Most users primarily use this mode. "Mirror" is a Holistic Holographic Broadcast when one is NOT using "RATES". You may choose to surround the Witness Sample with favorite supplements or remedies to include in the witness.
The Hypertronic Pro can broadcast a treatment to a client located anywhere in the world. It is not necessary for the client to be present when broadcasting.
Home Users
Select Mirror Switch. Mirror is for broadcasting remedial BioMirror broadcast frequency (see above image). The Hypertronic Pro can broadcast a treatment to a client located anywhere in the world. It is not necessary for the client to be present when broadcasting. Note: The "Mirror" Selection INVERTS the "vibrational signature" of the WITNESS SAMPLE on the In-Plate and Out-Plate EMPTY. Most users primarily use this mode. You may choose to surround the Witness Sample with favorite supplements or remedies to include in the witness. - Home Users
Leave all optional settings at zero or neutral.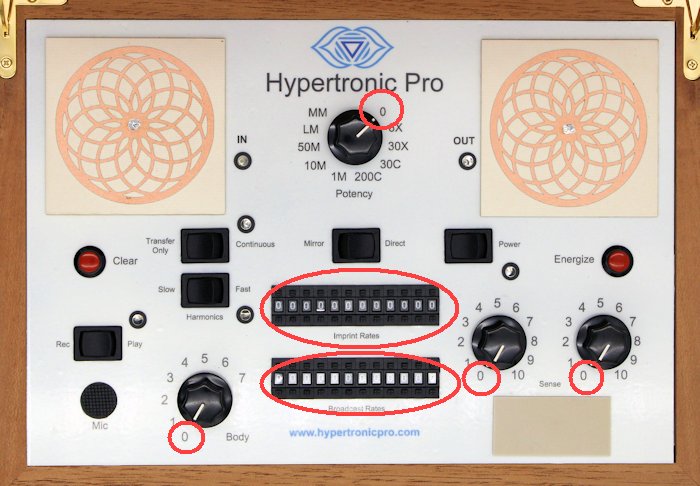
Professionals
Optional settings (leave optional settings at zero or neutral if not being used)
a. Set to HARMONICS, if desired. Slow or fast. Slow is 10MHz, fast is 10MHz pulsed at 15Hz. If you do not want to include harmonics, leave the switch in the middle position which excludes harmonics from the energy cycle. Including harmonics in the cycle simply adds Radio Frequency Harmonics to the broadcast e.g., 10MHz which penetrates the body easily as carry wave. Both options are good for carrying required healing frequencies deep into the body.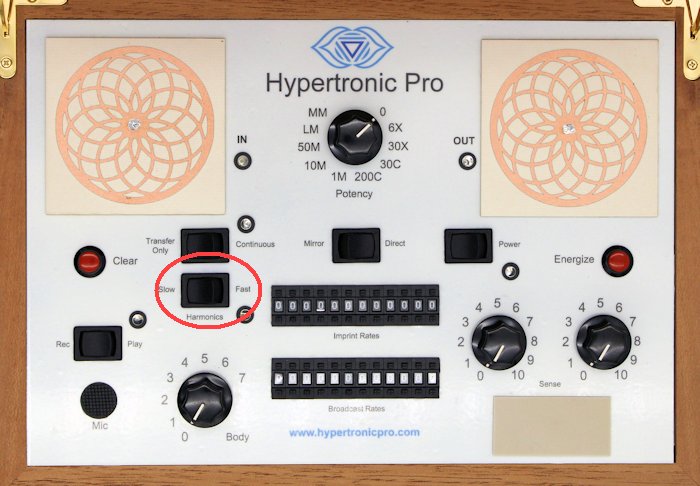
b. As a general rule, when entering a single number rate for homeopathic remedies, use Imprint Rates.
When broadcasting or needing to mirror, use Broadcast Rates. Broadcast Rates is more for the radionics side of things.
The Voice Playback and Harmonics can still be added to either Imprint Rates or Broadcast Rates. You can input a radionic rate at the lower rate bank: BROADCAST RATES (see above picture).
Rates are found by referencing the Radionic Guides on our web site. They are free to download and to use as a reference.
Always make sure numbers are entered from the right side. For example the Sulis guide says that the rate for producing a Typhoid vaccine is 61189991. It should be entered as 000061189991 as shown in the picture below and NOT as 611899910000.
Input a second rate if so desired in the upper bank marked IMPRINT RATES (the second rate cannot be used in MIRROR mode). Most references do however only have the one rate. If by chance you are using the Kelly Reference for Radionic Rates which consists of 2 rates, the first would go into BROADCAST RATES and the second into IMPRINT RATES. As an example if in the Kelly Reference Guide we have left 31.75 and right 23.00, then you would add 000000003175 into BROADCAST RATES and 000000002300 into IMPRINT RATES.
There are buttons above and below each of the numbers in the dial banks. To increase a number by 1, press the button underneath the number (marked + in the picture below). To decrease a number by 1, press the button above the number (marked - in the picture below.
c. If you are making a remedy, place the blank remedy onto the right broadcast plate. This could be a be an uncharged dropper bottle containing 25% brandy and 75% water, a small vial of sugar pillules (typically used by homoeopaths) or a blank balm or cream (for skin conditions). It could also be a psychometry message typed or written on a piece of paper included in the remedy or in the broadcast e.g., "Stop Smoking" or "Stop Drinking Alcohol". Note that directional messages for self gain or evil can have karmic consequence, so it is advised to use messages with direction very carefully if at all, or to ensure that it is discussed with the client before broadcasting so that they are aware.
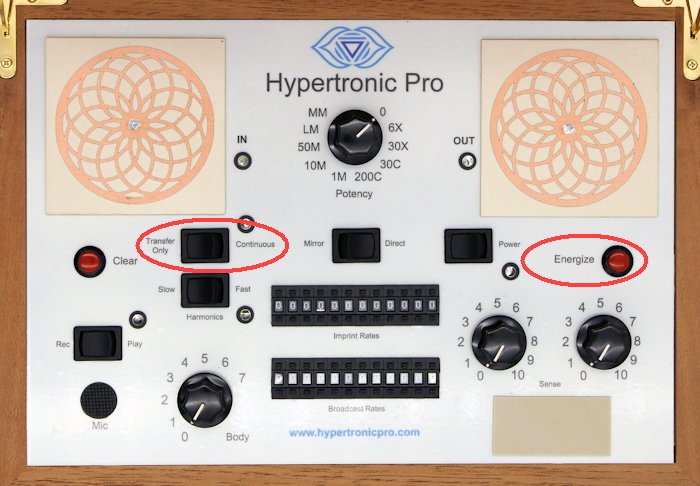
d. Set the the Continuous/Transfer Only switch to TRANSFER ONLY (Recommended) for a standard timed cycle of 24 seconds. You can alternatively use CONTINUOUS for an untimed always on function, but when you switch to continuous, the energize cycle will start so it is better to switch to continuous AFTER pressing Energize button (see below).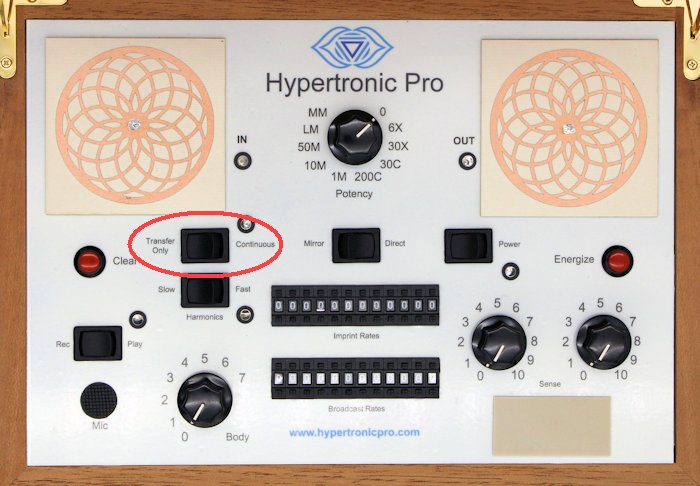
The duration of long-term broadcasting usually should not exceed 10 - 60 minutes. There is a separate indicator LED that indicates continuous broadcast is on.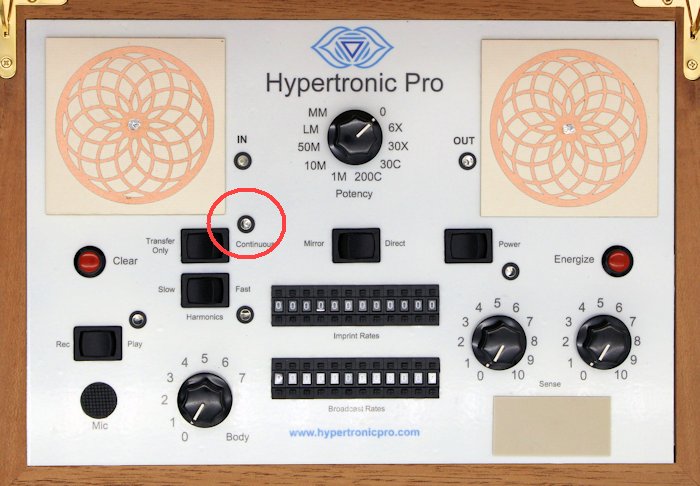
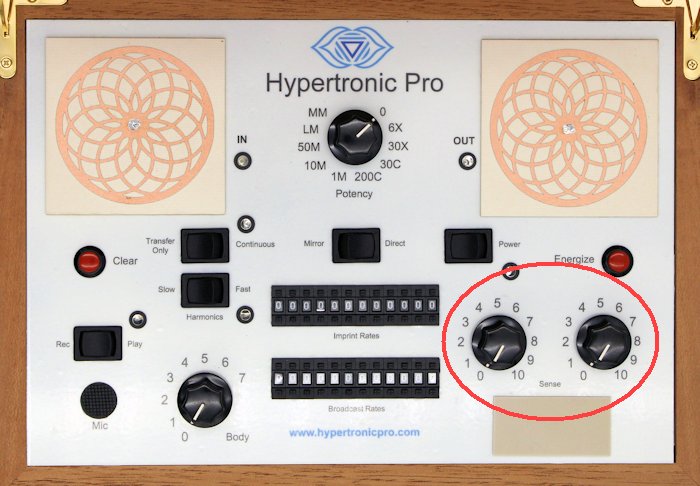
It is suggested that one use Kinesiological testing, dowsing or intuition for the ideal duration and for making other selections. However you may choose to Broadcast Continuously (when making remedies) by Selecting "Transfer Only" or "With Harmonics". While there is no maximum time for a broadcast, the user needs to be aware that the longer the broadcast, the bigger the risk risk of the body acclimating (becoming used to the frequency rendering it ineffective). The skilled practitioner should use the sense pad, or other techniques such as kinesiology when determining the maximum broadcast time.
e. If making a homoeopathic remedy, set the potency knob to adjust the strength of the broadcast (6x lowest; 50M highest).
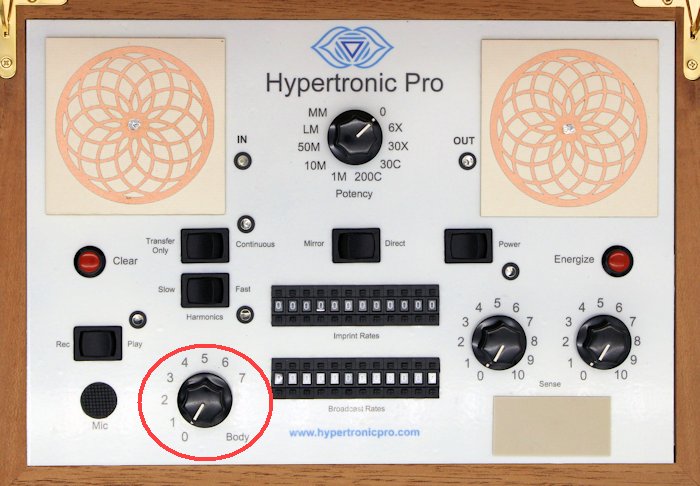
f. You can optionally add audio healing frequencies from any unit that has a 3.5mm headphone socket with standard line level audio output (e.g., an iPod, iPhone, mp3 player, radio, computer headphones outlet or a smart phone). The male to male 3.5 mm lead is used to connect your signal to the input on the rear of the unit marked B in the photo to the below. (Note: Standard Line Level Output is usually audio output suitable for headphones and must not exceed 1V RMS which can otherwise void warranty on the Hypertronic Pro. It is recommended that you check audio output specifications for the unit you are attaching before connecting). - Adjust BODY knob for desired level of consciousness. As a guide, the number settings are as follows: 0 – Neutral, 1 – Physical, 2 – Emotional, 3 – Mental, 4 – Astral, 5 – Etheric, 6 – Celestial (Lower Spiritual) and 7 – Ketheric (Higher Spiritual). (Click here for more information regarding the 7 levels of consciousness). For Home Users, it is recommended that you leave this setting at 0. Zero is basically a pass-through, removing the use of any setting, so that it does not need to be part of a particular plan.
- Optional: Add a will power intention to your remedy using the sense stick pad. To learn how to use the Sence stick pad, click here. Remember to always get the permission of the targeted witness when using sense as you are subjected to the laws of karma if you broadcast an intention unknowingly to the target.
- Press the ENERGIZE button to complete a 24 second energize/broadcast. The yellow LED close to the voice switch will blink while energizing is continuing. Wait for the cycle to complete. If doing a broadcast, this length of time is all that is necessary. To stop a continuous broadcast, first remove the remedy (if there are any on the input or output plates) THEN switch POWER off. If you wish to bypass the 24 second timed energize, switch from Transfer Only to Continuous JUST AFTER pressing the Energize button.
- If you wish to add a multiple rates to your remedy, repeat the process and energize the same remedy (e.g., pillules) for each rate. The resulting remedy will then consist of a number of rates.
 Caution: When adding several rates, you risk one rate interfering with another so use dowsing or intuition if you are intending to add multiple rates to the same remedy. As a general rule, a single rate is best, but you can add up to 5 rates if one does not interfere with the other.
Other Available Options
If you have your patient sitting with you, may may choose to apply the frequencies directly to them using the copper hand piece.
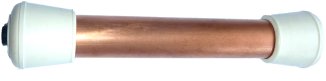
Connect the hand piece to port E shown below using one of the banana plug leads provided.Ask your patient to hold the hand piece and then press the Energize button.
In circumstances where the witness plate or broadcast plates are too small, use the provided copper plate to get a larger surface area to work with.

Connect the copper plate to port A for a larger witness plate, or to port E for a larger broadcast plate.
Add a comment